One of the most frustrating problems interior designers and 3D artists face is spending hours building a beautiful scene in 3ds Max, only to hit Render and end up with a result that’s too dark to see any detail.
If your V-Ray interior render looks black or heavily underexposed, don’t worry—this is a very common issue that can be fixed with a few lighting and exposure adjustments.
In this article, we’ll explore the most common causes of dark V-Ray renders in interior scenes and provide practical solutions that you can apply right away. Whether you’re working on residential interiors, commercial spaces, or photorealistic renders, these tips will help you get the lighting right from the start.
Why Are V-Ray Renders Often Dark in Interiors?
Interior scenes are naturally more challenging to light than exteriors because:
- They lack strong natural light sources.
- Walls and ceilings block light bounce.
- Incorrect camera settings or missing light sources can easily result in an underexposed image.
Let’s go step-by-step through the possible causes and how to fix them.
1. Make Sure V-Ray Is the Assigned Renderer
Before anything else, check that V-Ray is properly set up in your scene.
Go to:Render Setup > Common > Assign Renderer
Ensure V-Ray is selected for both Production and ActiveShade.
Without V-Ray assigned, you may be using a different renderer (like Arnold or Scanline) that won’t respect your V-Ray lights or settings.
2. Add Proper Light Sources to Your Scene
One of the most common reasons for dark interior renders is a lack of artificial lighting.
Here’s what to do:
- Use V-Ray Lights such as:
V-Ray Light (Plane)for ceiling fixturesV-Ray IESfor spotlightsV-Ray Dome Lightwith HDRI for soft environmental lighting
- Check if the V-Ray Sun is entering the room. If your room is fully closed or has small windows, sunlight won’t bounce enough to illuminate the space.
💡 Pro Tip: Always use both natural and artificial light sources for interiors.
3. Use the V-Ray Physical Camera Correctly
V-Ray’s camera simulates a real DSLR camera, so incorrect exposure settings can cause your scene to appear completely dark.
Check these camera settings:
- Shutter Speed: Lower it (e.g., from 50 to 5) to let in more light.
- F-Number: Lower values (like f/2.8) let in more light. Avoid very high values like f/16 for indoor scenes.
- ISO: Increase ISO (from 100 to 200 or 300) to brighten your image.
4. Enable GI (Global Illumination)
Without Global Illumination, light will not bounce around the scene realistically—causing large areas to stay dark.
Go to:Render Setup > V-Ray > Global Illumination
Make sure GI is enabled, and use:
- Primary engine: Irradiance Map
- Secondary engine: Light Cache
These two engines simulate indirect lighting, which is crucial for interiors.
5. Check Material Settings
Sometimes materials with black diffuse colors, extremely low reflection values, or incorrect normals can make your scene look darker than expected.
Quick checklist:
- Are your walls, ceiling, and floor materials reflecting enough light?
- Avoid pure black or ultra-dark diffuse maps unless required
- Double-check normal maps or bump settings to ensure no light leaks or black patches
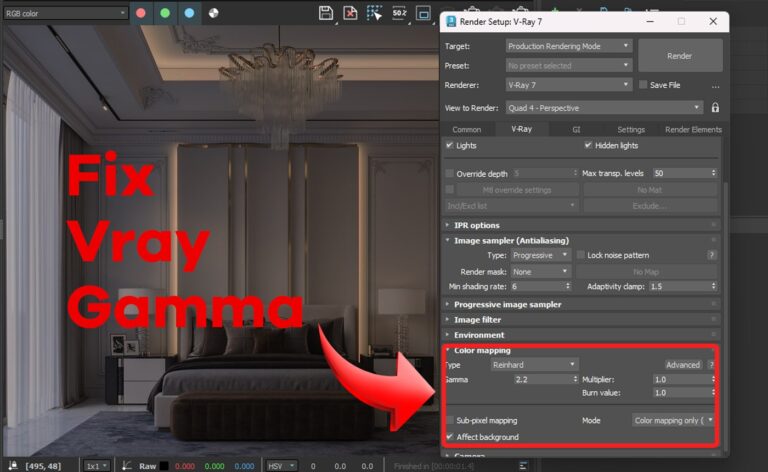
6. Use Exposure Control (Color Mapping)
Make sure you’re using Color Mapping correctly in V-Ray:
Go to:Render Setup > V-Ray > Color Mapping
Recommended settings:
- Type: Reinhard
- Gamma:
2.2 - Burn value:
0.2 – 0.6for balanced highlights
This helps maintain exposure consistency while giving you more control over highlights and shadows.
7. Use the V-Ray Frame Buffer with sRGB Preview Enabled
Always enable sRGB in the V-Ray Frame Buffer to get a preview that’s closer to how the final render will look.
If sRGB is disabled, your image may appear too dark in the frame buffer—even though it will save correctly. Keeping it enabled ensures you see what you’re actually going to get.
Summary: Quick Checklist to Fix a Dark V-Ray Interior Render
| What to Check | Solution |
|---|---|
| Renderer | Make sure V-Ray is assigned |
| Lighting | Add V-Ray lights and check windows |
| Camera | Adjust Shutter Speed, F-Number, ISO |
| GI | Enable Global Illumination |
| Materials | Avoid overly dark shaders |
| Exposure | Use Reinhard Color Mapping with Gamma 2.2 |
| VFB | Enable sRGB preview |
Learn More with Real-Time Examples
If you’re still struggling with lighting in your interior scenes, don’t worry—I’ve got your back.
👉 Subscribe to my YouTube channel @zkacademy1
There, I post practical tutorials on 3ds Max and V-Ray, including lighting techniques, rendering tricks, and full project breakdowns for interiors and architecture.
💡 Hit the bell so you don’t miss the next tutorial!